

THE BEST RECIPE FOR WHITE GERMAN CHOCOLATE CAKE: Crafting a Luminous Masterpiece
Essential Ingredients for Your Ultimate White German Chocolate Cake 🍰🥥🥜
The foundation of an exceptional cake lies in the quality and preparation of its ingredients. Each component plays a vital role in achieving the perfect texture, flavor, and visual appeal.
For the Best White Cake Layers:
- All-Purpose Flour (Bleached, Unbleached) 🌾: 3 cups (approximately 360 grams). The choice of flour is critical. A good quality, unbleached all-purpose flour works wonderfully. While bleached flour can sometimes yield a slightly whiter cake, unbleached offers a subtly richer flavor and good structure. Sifting is non-negotiable for lightness.
- Granulated Sugar (Fine) 🍚: 2 cups (approximately 400 grams). Sugar not only provides sweetness but also contributes to moisture retention and tenderness. Fine granulated sugar dissolves easily, leading to a smoother batter.
- Unsalted Butter (Softened) 🧈: 1 cup (2 sticks or 226 grams). High-quality unsalted butter is key for richness and flavor. Ensure it’s genuinely softened to room temperature (about 68-70°F or 20-21°C). This means it should yield slightly when pressed but not be greasy or melted. Cold butter won’t cream properly, and melted butter will result in a dense cake.
- Egg Whites (Large) 🥚🥚🥚🥚🥚🥚: 6 large egg whites (approximately 180-200 grams, or from 6-7 large eggs). Using only egg whites keeps the cake color pristine white and contributes to a delicate, airy crumb. Make sure they are at room temperature for maximum volume when whipped.
- Whole Milk (Room Temperature) 🥛: 1 cup (240 ml). Whole milk adds moisture and richness. Like the butter and egg whites, it must be at room temperature to prevent curdling the batter and ensure a smooth emulsion.
- Pure Vanilla Extract 🌿: 2 teaspoons. Essential for the classic vanilla flavor that defines a white cake. Use high-quality pure vanilla extract, not imitation, for the best aroma and taste.
- Baking Powder 🥄: 1 tablespoon (15 grams). This leavening agent is responsible for the cake’s rise and tender crumb. Ensure it’s fresh for optimal activity.
- Salt 🧂: 1/2 teaspoon. A crucial ingredient that enhances all other flavors and balances the sweetness. Do not omit.
For the Signature Coconut-Pecan Frosting:
- Evaporated Milk 🥛: 1 can (12 ounces or 354 ml). Evaporated milk is the traditional base for this frosting. Its concentrated milk solids contribute to the unique creamy, slightly caramelized flavor and thick texture. Do not confuse it with sweetened condensed milk.
- Granulated Sugar 🍚: 1 cup (approximately 200 grams). Provides sweetness and helps the frosting set.
- Unsalted Butter 🧈: 1/2 cup (1 stick or 113 grams). Adds richness and smooth texture to the cooked frosting.
- Egg Yolks (Large) 🥚🥚🥚: 3 large egg yolks (from the eggs whose whites were used for the cake). Egg yolks thicken the custard-like base of the frosting and contribute to its rich, velvety texture and golden hue.
- Pure Vanilla Extract 🌿: 1 teaspoon. Enhances the overall flavor profile of the frosting.
- Shredded Sweetened Coconut 🥥: 1 ½ cups (approximately 115 grams). Sweetened shredded coconut is traditional. Toasting it lightly before adding can enhance its flavor and aroma.
- Chopped Pecans 🌰: 1 ½ cups (approximately 170 grams). Pecans add a delightful crunch and nutty flavor. Toasting them brings out their full potential.
For Garnish (Optional but Recommended):
- Additional Toasted Pecan Halves 🌰: For decorative topping.
- Small Toasted Coconut Flakes 🥥: For added visual appeal and texture.
Detailed Preparation: A Step-by-Step Journey to Perfection
This recipe requires attention to detail and temperature control, especially for the cake batter. Follow each step carefully for the best results.
Part 1: Preparing the White Cake Layers (The Canvas)
- Preheat Oven and Prepare Pans (Foundation for Success):
- Preheat your oven to 350°F (175°C). It’s paramount that the oven is fully preheated to the correct temperature before the cake enters. An accurately heated oven ensures even baking and proper rising, preventing a dense or sunken cake.
- Prepare three 8-inch (20 cm) round cake pans. This is a three-layer cake, so three pans are ideal for even, relatively thin layers. If you only have two pans, you can bake in two batches, but ensure all batter is baked promptly.
- Grease each pan generously with butter or a baking spray. Use your fingers or a paper towel to ensure every crevice is coated.
- Flour the greased pans. Sprinkle a tablespoon or two of all-purpose flour into each greased pan. Rotate the pan, gently tapping it, to ensure the flour coats the entire greased surface. Invert the pan and tap out any excess flour. This creates a non-stick barrier, ensuring the cakes release cleanly. For extra insurance, you can cut parchment paper circles to fit the bottom of each pan before greasing and flouring.
- Combine Dry Ingredients (Precision Mixing):
- In a medium bowl, sift together the 3 cups of all-purpose flour, 1 tablespoon of baking powder, and 1/2 teaspoon of salt. Sifting is a crucial step for a light and tender cake. It aerates the flour, breaks up any lumps, and ensures the leavening agent and salt are evenly distributed. Use a fine-mesh sieve or a flour sifter. Whisk these dry ingredients gently to fully combine. Set aside.
- Cream Butter and Sugar (Aeration is Key):
- In a large mixing bowl (preferably the bowl of a stand mixer fitted with the paddle attachment, or a large bowl for a hand mixer), add the 1 cup of softened unsalted butter and 2 cups of granulated sugar.
- Beat on medium-high speed for 5 to 7 minutes. This process, known as “creaming,” is vital. During this time, the sharp edges of the sugar crystals cut into the butter, creating tiny air pockets. These air pockets will expand during baking, contributing significantly to the cake’s light and fluffy texture. The mixture should become very light in color (pale yellow to almost white), fluffy, and significantly increased in volume. Scrape down the sides of the bowl frequently with a rubber spatula to ensure all butter and sugar are incorporated.
- Add Egg Whites (Building Structure):
- With the mixer on low speed, gradually add the 6 room-temperature egg whites, one at a time. Add a small amount, let it incorporate fully, and then add the next. This slow addition prevents the mixture from separating.
- Once all egg whites are added, increase the speed to medium and beat for another 2-3 minutes until the mixture is light and fluffy again, almost like a whipped meringue texture. The egg whites provide structure and volume without the richness or color of yolks.
- Incorporate Wet and Dry Ingredients Alternately (Maintaining Emulsion):
- Now, you will add the sifted dry ingredients and the room-temperature whole milk to the creamed mixture in alternating additions. This technique helps to maintain the emulsion of the batter, preventing it from curdling and ensuring a smooth, consistent texture.
- Begin and end with the dry ingredients.
- With the mixer on the lowest speed, or using a large rubber spatula for manual mixing:
- Add about one-third of the dry ingredients to the butter-egg mixture. Mix just until barely combined.
- Then, pour in half of the milk. Mix just until barely combined.
- Repeat with another third of the dry ingredients, then the remaining half of the milk.
- Finish with the final third of the dry ingredients.
- Mix only until just combined and no streaks of flour are visible. Overmixing at this stage will develop the gluten in the flour too much, resulting in a tough, dense cake. Use gentle folds if mixing by hand, ensuring you scrape down the sides and bottom of the bowl to incorporate everything evenly.
- Finally, stir in the 2 teaspoons of pure vanilla extract until just combined. The batter should be smooth, light, and airy.
- Divide Batter and Bake (The Magic Moment):
- Evenly divide the batter among the three prepared 8-inch cake pans. Use a kitchen scale for precise division if you want perfectly even layers (approximately 450-480 grams per pan). Level the tops gently with an offset spatula.
- Place the pans in the preheated oven. If possible, arrange them on separate racks, ensuring there’s enough space for air circulation. If you can only fit two, bake them first, then the third.
- Bake for 25 to 30 minutes, or until the cakes are golden brown on top, spring back when lightly touched in the center, and a wooden skewer or toothpick inserted into the center comes out clean. The exact baking time will vary based on your oven’s calibration. Avoid opening the oven door during the first 20 minutes of baking to prevent the cakes from sinking.
- Rotate the pans halfway through baking (after about 15 minutes) for even browning, especially if you know your oven has hot spots.
- Cool the Cakes (Patience is a Virtue):
- Once baked, remove the cake pans from the oven and place them on a wire rack. Let them cool in the pans for 10 to 15 minutes. This brief cooling period allows the cake structure to set and become firmer, making it less likely to break when inverted.
- After 10-15 minutes, carefully invert the cakes onto the wire rack. Gently peel off any parchment paper from the bottom.
- Allow the cake layers to cool completely, undisturbed, on the wire rack for at least 1 to 2 hours, or until they reach room temperature. Attempting to frost warm cakes will cause the frosting to melt and slide off. For easier handling and frosting, you can wrap cooled layers tightly in plastic wrap and chill them in the refrigerator for an hour or even freeze them for 20-30 minutes; slightly firm cakes are less prone to tearing.

Part 2: Preparing the Signature Coconut-Pecan Frosting (The Irresistible Crown)
- Toast Coconut and Pecans (Flavor Intensification):
- This optional but highly recommended step significantly boosts the flavor of the nuts and coconut.
- Preheat your oven to 300°F (150°C). Spread the 1 ½ cups shredded sweetened coconut and 1 ½ cups chopped pecans on separate baking sheets in a single layer.
- Toast for 5 to 10 minutes, stirring occasionally, until they are lightly golden and fragrant. Keep a close eye on them, as they can burn quickly. Remove from oven and let cool completely. Once cooled, they will become crispier.
- Cook the Custard Base (The Heart of the Frosting):
- In a medium-sized heavy-bottomed saucepan, combine the 1 can (12 oz) evaporated milk, 1 cup granulated sugar, 1/2 cup unsalted butter, and 3 large egg yolks.
- Whisk these ingredients continuously over medium-low heat. Continuous whisking is crucial to prevent the egg yolks from scrambling and to ensure the mixture cooks evenly.
- Cook for 10 to 12 minutes, or until the mixture thickens to the consistency of a thin custard or pouring cream. It should coat the back of a spoon, and when you run your finger across the spoon, it should leave a clear path. The mixture will slightly thicken more as it cools. Do not let it boil vigorously, as this can curdle the eggs. Maintain a gentle simmer.
- Finish the Frosting (Adding Texture and Aroma):
- Once the custard base has thickened, remove the saucepan from the heat.
- Stir in 1 teaspoon of pure vanilla extract.
- Immediately add the toasted shredded coconut and toasted chopped pecans to the hot custard. Stir well to fully combine, ensuring all the nuts and coconut are coated.
- Let the frosting cool completely at room temperature. This step is essential. As it cools, the frosting will thicken considerably, reaching the perfect spreadable consistency. This can take 1-2 hours. If you’re in a hurry, you can place the saucepan in a larger bowl of ice water, stirring frequently, to speed up cooling, but ensure it’s fully cool before spreading.
Part 3: Assembling Your White German Chocolate Cake (The Grand Presentation)
- Level the Cake Layers (If Necessary):
- Once the cake layers are completely cool, inspect them. If any layers have a significant dome on top, use a long, serrated knife or a cake leveler to gently slice off the top part to create flat, even surfaces. This ensures a stable and professional-looking layered cake.
- Frosting the Layers (Building the Masterpiece):
- Place one leveled cake layer on your serving plate or cake stand. You might want to put a few strips of parchment paper under the edges of the cake to keep the plate clean during frosting, then remove them at the end.
- Spread about one-third of the cooled coconut-pecan frosting evenly over the top of the first cake layer. Use an offset spatula to spread it right to the edges.
- Carefully place the second cake layer on top of the frosted first layer, aligning it. Gently press down to secure.
- Spread another third of the frosting evenly over the second layer.
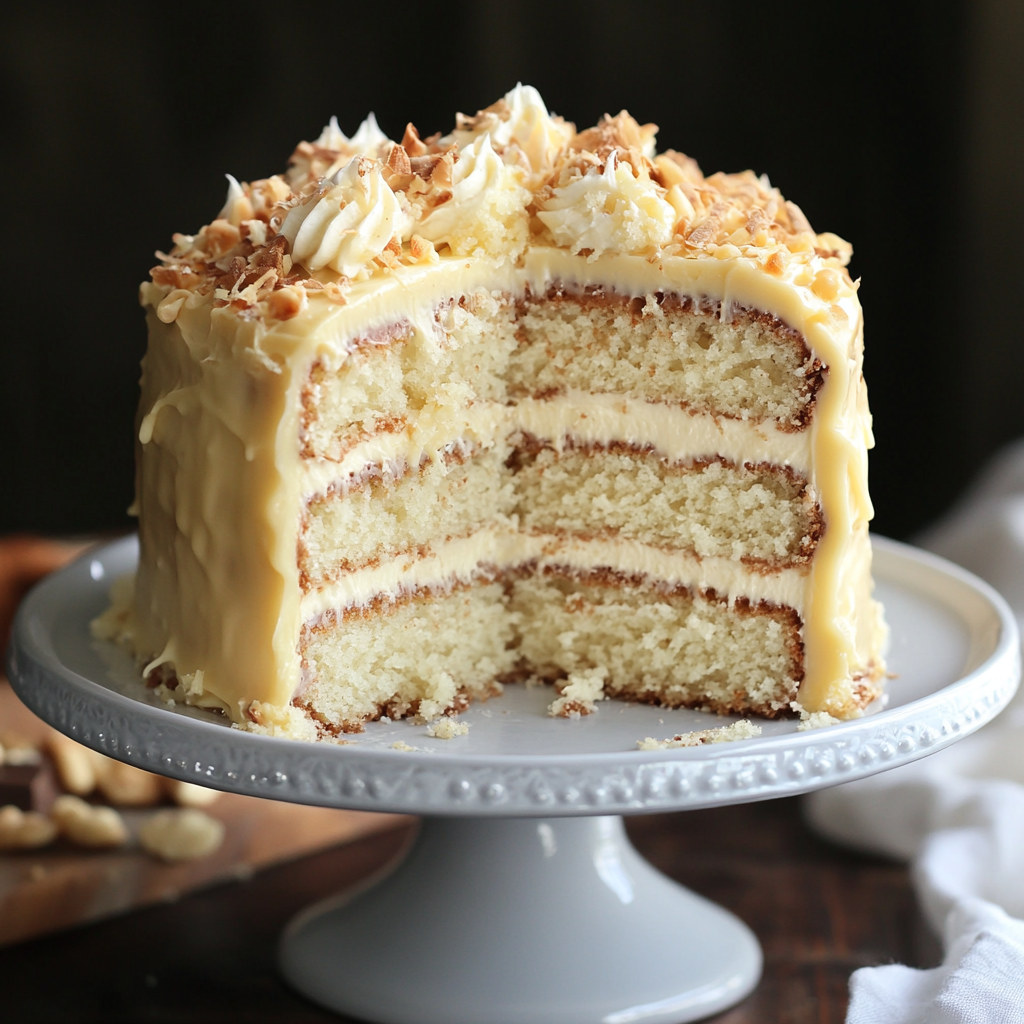
- Place the third and final cake layer on top. Spread the remaining frosting over the top of the cake, distributing it evenly. Some people prefer to let the frosting cascade slightly over the edges, creating a rustic look. This frosting is typically not used for the sides of the cake, leaving the white cake visible, which is part of the aesthetic of a White German Chocolate Cake.
- Garnish and Chill (The Finishing Touches):
- If desired, garnish the top of the cake with a few whole toasted pecan halves and/or a sprinkle of small toasted coconut flakes for added visual appeal.
- For best results, chill the cake in the refrigerator for at least 1 hour (or longer) before slicing and serving. Chilling allows the frosting to firm up, making the cake easier to slice cleanly and enhancing its overall texture.
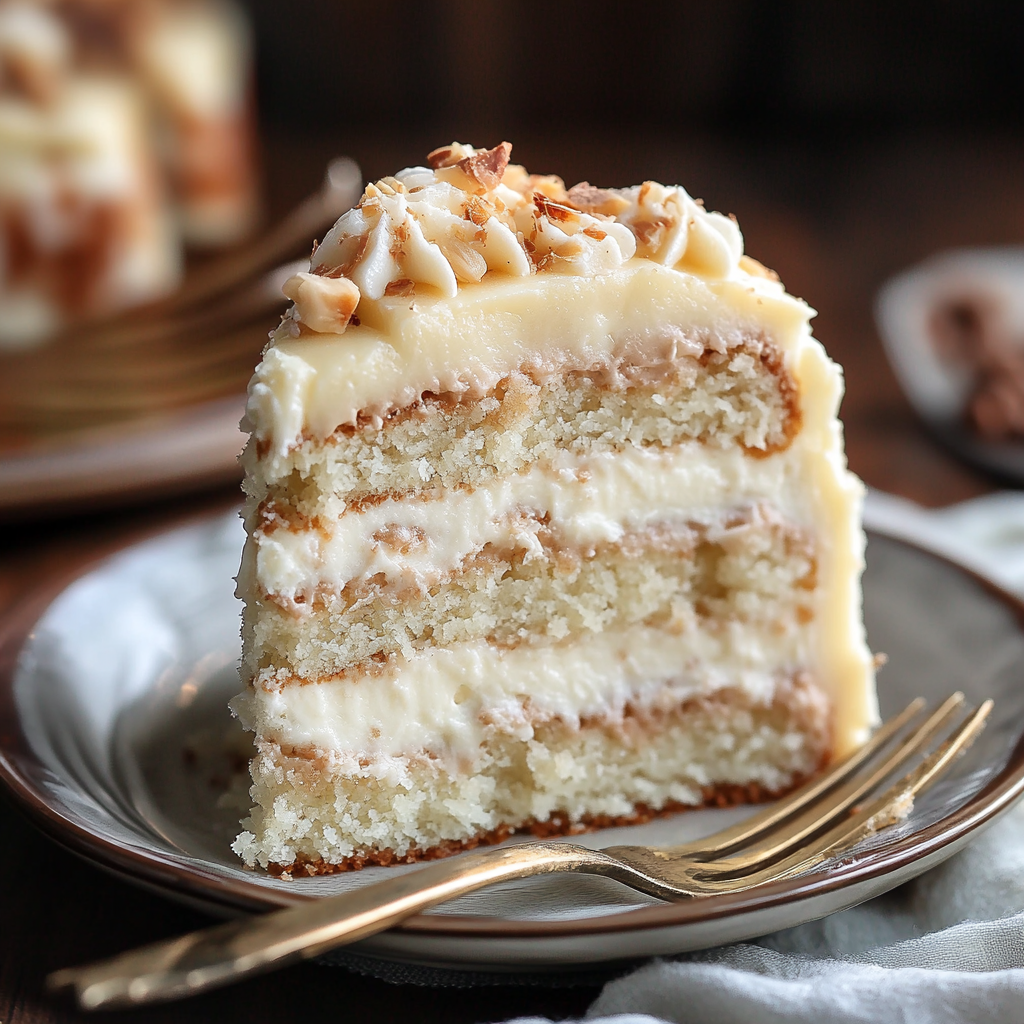
- Slice and Serve (Enjoy Your Creation!):
- Using a long, sharp serrated knife, slice the cake into generous portions. For clean slices, wipe the knife clean with a damp cloth between each cut.
- Serve chilled or at cool room temperature.
Estimated Preparation Time ⏱️
- Active Preparation (Mixing, Cooking Frosting, Assembly): 45-60 minutes
- Cake Baking Time: 25-30 minutes
- Cooling Time (Cake Layers): 1-2 hours
- Cooling Time (Frosting): 1-2 hours
- Chilling Time (Assembled Cake): At least 1 hour (recommended)
- Total Estimated Time: Approximately 3.5 to 5 hours (with some passive cooling time).
Additional Tips for Your Best White German Chocolate Cake 💡
- Room Temperature Ingredients are Non-Negotiable: This cannot be stressed enough. For the cake, soft butter, room-temperature eggs, and milk ensure a smooth, emulsified batter that bakes evenly and yields a tender crumb. For the frosting, while it’s cooked, beginning with room temperature egg yolks can help prevent scrambling.
- Accuracy in Measuring: Baking is chemistry. Use kitchen scales for flour and sugar for the most accurate results. Scooping flour directly from the bag can lead to too much flour. Spoon it into your measuring cup and then level it off.
- Do Not Overmix: Especially after adding the dry ingredients to the cake batter. Overmixing develops gluten, which makes cakes tough. Mix only until just combined.
- Perfecting the Frosting Consistency: If your frosting seems too thin after cooling, you can gently place it back on very low heat, stirring constantly, to reduce it slightly, or add a tiny bit more powdered sugar (though this isn’t traditional). If it’s too thick, you can gently warm it slightly or whisk in a tablespoon of whole milk or cream until it reaches the desired spreadable consistency.
- Toasting Nuts and Coconut: While optional, taking the extra 10 minutes to lightly toast the pecans and shredded coconut before adding them to the frosting elevates their flavor significantly, adding depth and nuttiness.
- High-Quality Vanilla: Since vanilla is a primary flavor in the white cake, using pure vanilla extract (not imitation) makes a noticeable difference in the overall taste.
- Preventing Dry Cake Layers: Ensure you don’t overbake. The toothpick test is your friend. Every oven is different, so learn yours. A slight golden color and a springy top are good indicators.
- Leveling for Success: Investing in a cake leveler or mastering the technique with a serrated knife will ensure your layers stack beautifully and the cake looks professional.
- Chilling the Assembled Cake: This step isn’t just for appearance. Chilling allows the frosting to set, prevents shifting of layers, and makes for cleaner slices. It also allows the flavors to meld beautifully.
- Storage: Store the cake in an airtight container at room temperature for up to 2-3 days, or in the refrigerator for up to 5 days. Bring to room temperature before serving for optimal flavor and texture.
- Freezing: Both the unfrosted cake layers and the frosting can be frozen separately. Wrap cooled cake layers tightly in plastic wrap and then foil; they freeze well for up to 2-3 months. The frosting can be frozen in an airtight container for up to 1 month. Thaw in the refrigerator overnight before assembling.
Conclusion: A Legacy Reimagined, a Masterpiece Achieved 💖
“The Best Recipe for White German Chocolate Cake” is more than just a culinary instruction; it is an invitation to explore the delightful possibilities of reimagining a classic. This cake stands as a brilliant testament to innovation in baking, taking the beloved, comforting essence of German Chocolate Cake and infusing it with a radiant elegance. By replacing the dark chocolate layers with a perfectly crafted, moist, and tender white cake, this recipe offers a brighter, yet equally decadent, sensory experience.
Every step in this meticulous process, from the precise creaming of butter and sugar to the careful cooking of the iconic coconut-pecan frosting, is designed to ensure a flawless result. The ethereal lightness of the white cake provides an exquisite canvas for the rich, chewy, and intensely flavorful topping, creating a harmony of textures and tastes that is truly unparalleled.
This White German Chocolate Cake is not just a dessert; it’s a centerpiece, a conversation starter, and a true labor of love. It’s perfect for grand celebrations, intimate gatherings, or simply as a luxurious treat to elevate an ordinary day. The satisfaction of slicing into its beautifully layered structure and savoring its complex yet balanced flavors is immensely rewarding.